Prisirah
Building digital photo frames for family and friends using open-source hardware1 and free software in X=? minutes.2
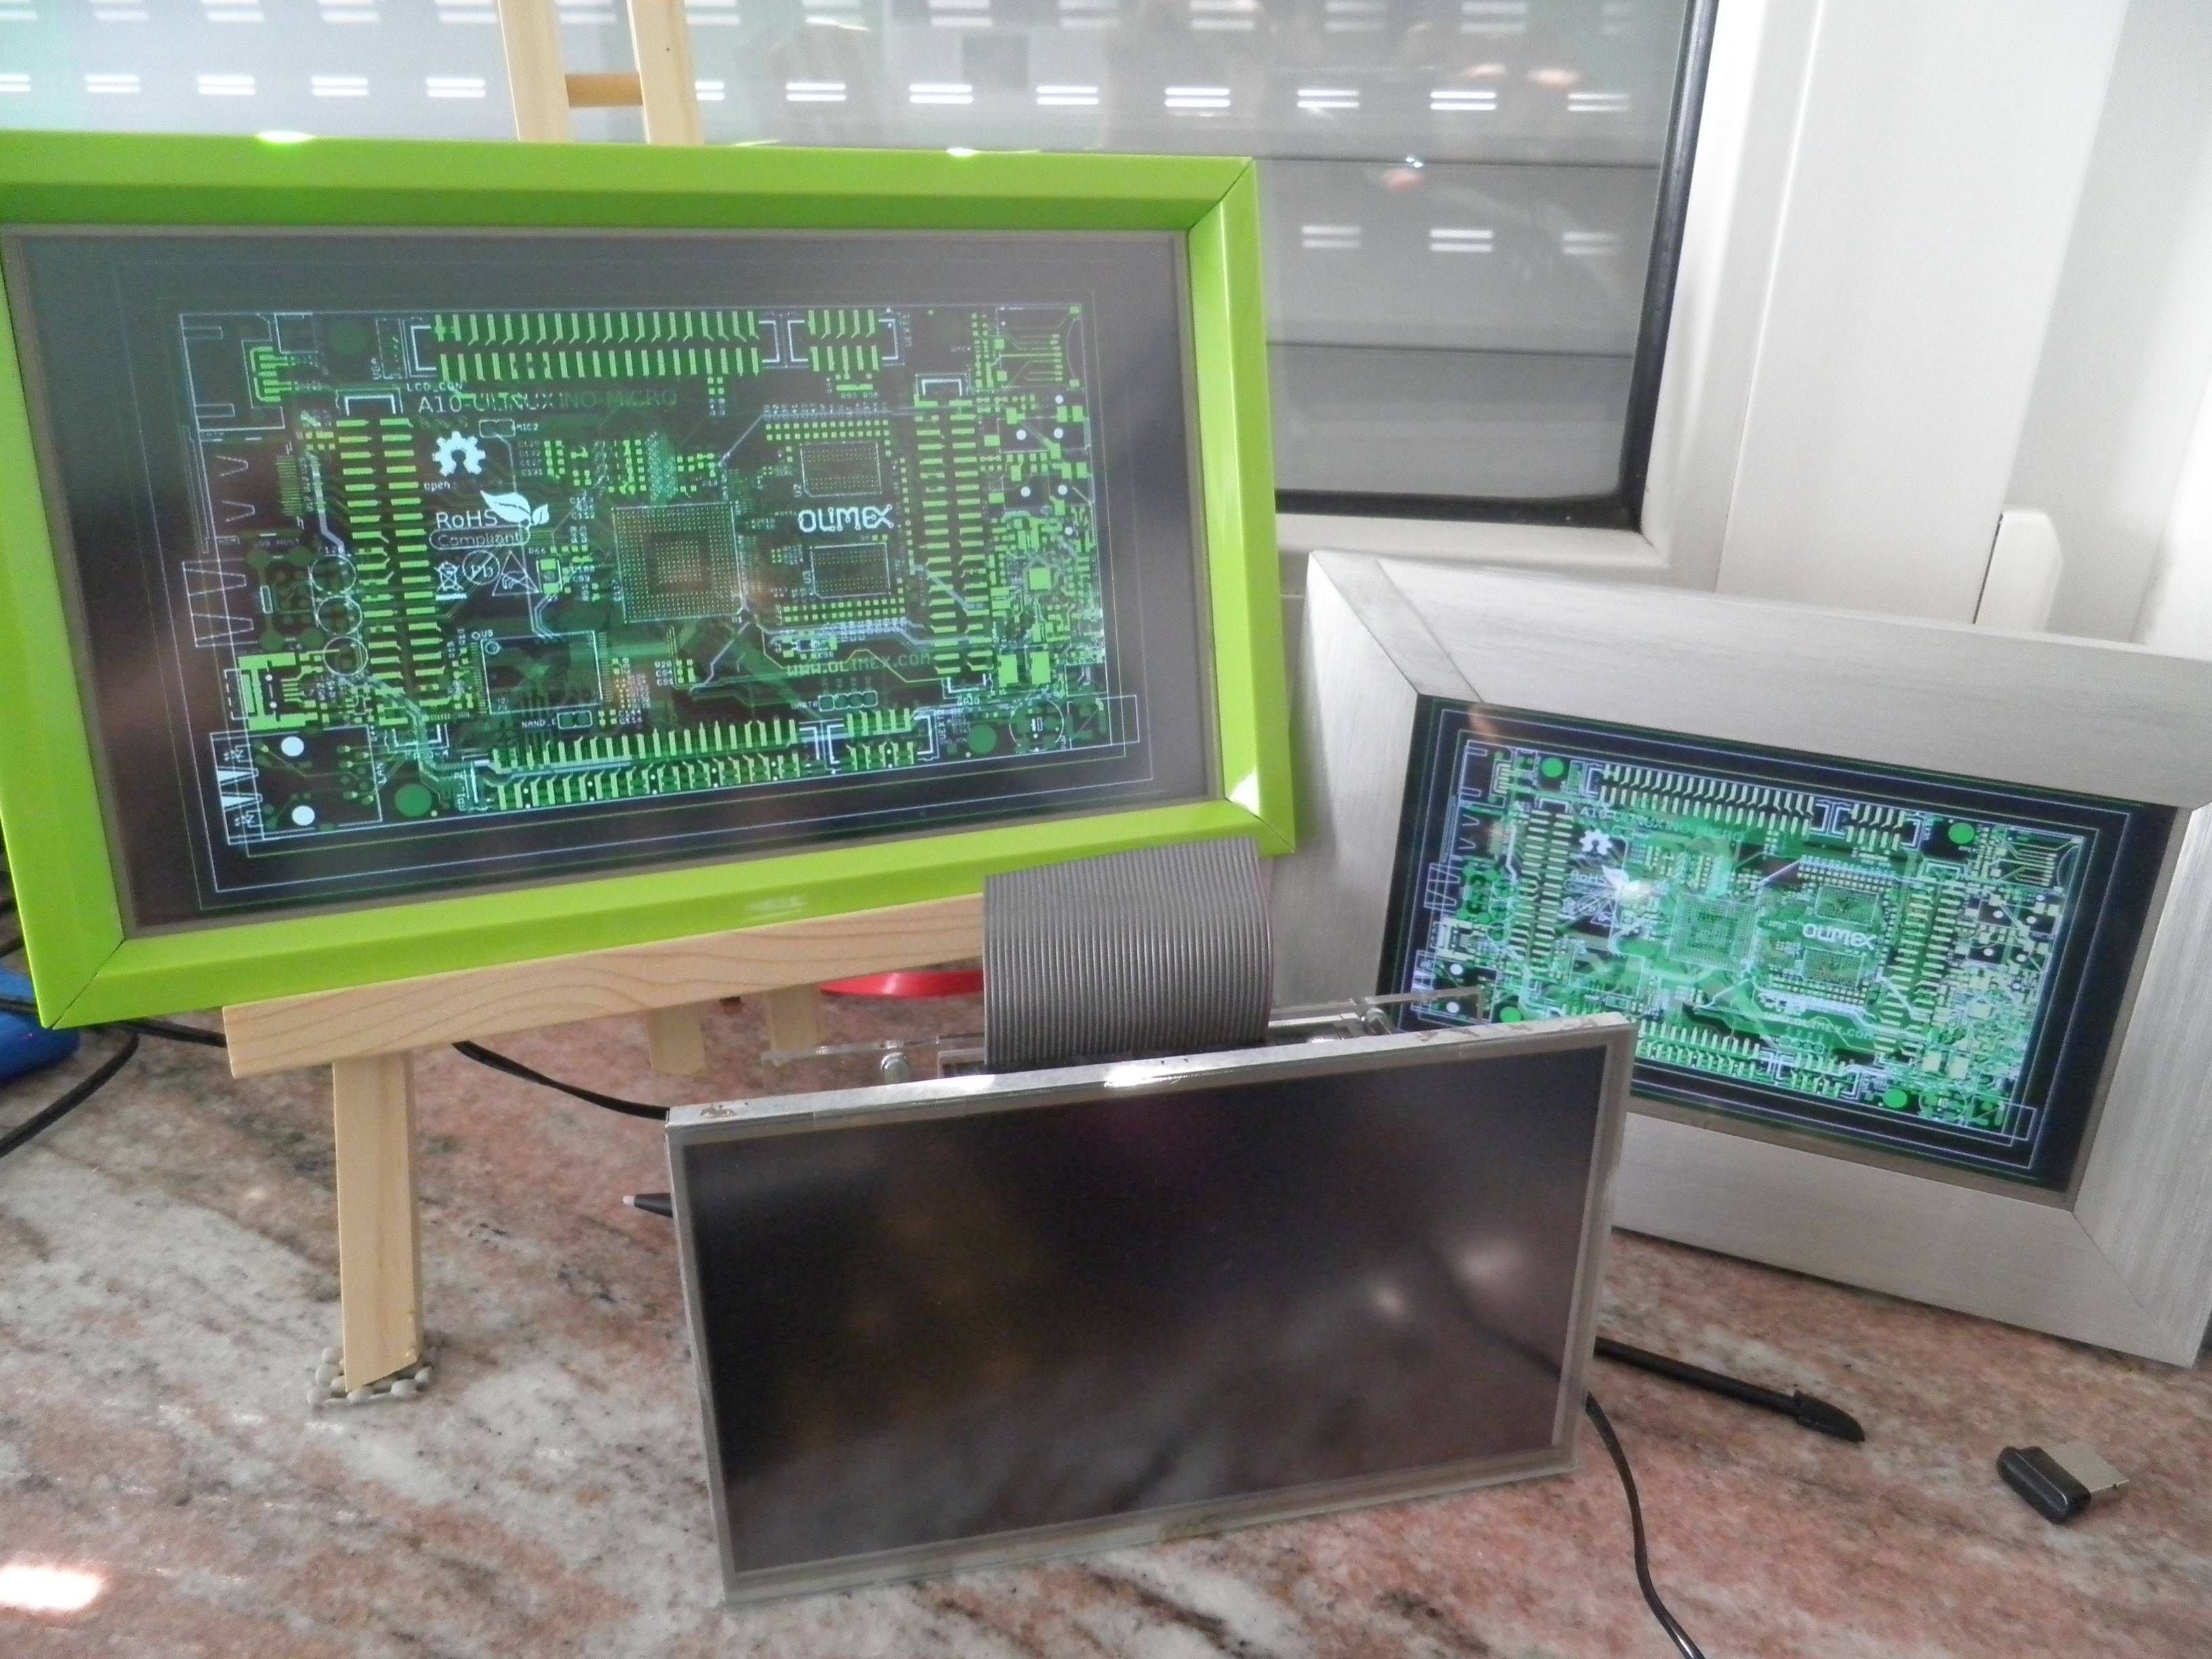
Figure 1: different A20‑OLinuXino‑MICRO prototypes: 2 using A13‑LCD7‑TS and one using A13‑LCD10TS
Table of Contents
1 ATTENTION / WARNING
This page exists only for historical reasons. The software is outdated and the photo sharing won't work anymore because tor hidden services were replaced with newer versions now called onion service. S.a. https://blog.torproject.org/v2-deprecation-timeline/
I still would like to update the project but don't have the time at the moment.
2 Introduction
As I recently became a father I was more or less forced by many to share photos of our lovely son. At the same time it became evident that our internet traffic is monitored and captured3 and even worse that you can't trust your hardware4. First of all this is a political and social problem, but it likely will need some time to get that fixed. That was the reason to build digital picture frames for family and friends using open-source hardware1 and free software that allow to share photos via internet while at least trying to protect our privacy.
WARNING: this is still work in progress and should be considered pre-alpha!
About this document
Versions
The latest version is always at http://karme.de/prisirah/. A printable version is at http://karme.de/prisirah/prisirah.pdf. The document source is at http://karme.de/prisirah/prisirah.org or you can get it via Git (s.a. 9.1):
$ git clone https://www.karme.de/git/prisirah-image-builder
Conventions
Terminal / shell interaction:
$ echo hello
hello
In this case you are expected to type "echo hello" in a terminal/shell. The character string "$ " only indicates your command prompt that likely will look different on your system, you don't type it. The output will be "hello" as indicated by the second line. The output isn't always included for brevity.
If a line ends with a "\", you are expected to type the next line, too:
$ echo hello \
world
hello world
If you are expected to replace some text first it is indicated like this:
$ echo «TOREPLACE»
hello
To make the output match the input you have to replace "«TOREPLACE»" with "hello".
WARNING: Never ever type in some text from some web-site without thinking, especially if you are using http instead of https. Make sure you understand what you are doing first.
3 Open-source Hardware
As base Olimex's open-source hardware boards are used. You can choose between the A20‑OLinuXino‑MICRO and the A20‑OLinuXino‑LIME2. Both are single-board computers (SBCs) using the Allwinner A20 system on a chip (SoCs).5
The A20‑OLinuXino‑MICRO is bigger but has more ports and is easier to handle. In the A20-ENC plexyglass enclosure6 the A20‑OLinuXino‑MICRO takes approximately 15cm x 9cm x 4cm of space. It accepts 6-16V power input. Especially the audio headphones output is missing on the A20‑OLinuXino‑LIME2. For the A20‑OLinuXino‑LIME2 there is a nice small box that only takes approximately 9cm x 6.5cm x 3cm of space and it needs 5V power input.7 Both are nice devices – maybe grandpa might feel more comfortable with a completely closed box. (Update: there are now nice boxes for the A20‑OLinuXino‑MICRO, too and for the A20‑OLinuXino‑LIME2 there are nice metal boxes that integrate the display: LCD7-METAL-FRAME and LCD10-METAL-FRAME.)
As display you can choose between the 7" LCD‑OLinuXino‑7TS and the 10" LCD‑OLinuXino‑10TS.8 Unfortunately I got displays and touch screen components differing in quality9, 10.
| Required part | approx. price (€) | comments |
|---|---|---|
| A20‑OLinuXino‑MICRO | 65 | |
| LCD‑OLinuXino‑7TS | 65 | You can also use the LCD‑OLinuXino‑10TS (~90€) |
| CABLE-IDC40-15cm | 2 | maybe you still have lots of old PATA cables? |
| SY0612E (12V, 0.5A) or Watterott HNP24-120 (12V, 2A) | 8 | plug: 5mm/2.1mm - maybe you have a good enough PSU - for the 10" display the SY0612E might not suffice |
| Samsung Pro MB-MGBGB Class 10 | 20 | any fast microSDHC card >= 8G should do 11 |
| Subtotal | 160 | |
| Recommended part | ||
| MOD‑WIFI‑R5370‑ANT or MOD‑WIFI‑AR9271‑ANT | 10 | USB Wireless adapter 12 |
| USB-SERIAL-CABLE-F | 7 | one of those should be enough |
| ALUMINIUM-HEATSINK-20x20x6MM | 1 | not sure if it's really needed |
| A20-ENC | 6 | to mount your board |
| 4 nuts | 1 | to adjust the distance of the A20-ENC |
| stylus | 2 | for handwriting recognition |
| A20-VGA-CABLE | 3 | VGA adapter from 6-pin connector |
| Total | 190 |
| Required part | approx. price (€) | comments |
|---|---|---|
| A20‑OLinuXino‑LIME2 | 54 | |
| LCD‑OLinuXino‑7TS | 65 | You can also use the LCD‑OLinuXino‑10TS (~90€) |
| SY0605E (5V, 1.2A) or Watterott HNP18-050 (5V, 3A) | 9 | Attention: 5V! For the 10" display the SY0605E is not strong enough |
| CABLE-40-40-10CM | 4 | Better order at least 2 as they break easily |
| Samsung Pro MB-MGBGB Class 10 | 20 | any fast microSDHC card >= 8G should do |
| Subtotal | 152 | |
| Recommended part | ||
| MOD‑WIFI‑R5370‑ANT or MOD‑WIFI‑AR9271‑ANT | 10 | USB Wireless adapter 12 |
| USB-SERIAL-CABLE-F | 7 | one of those should be enough |
| ALUMINIUM-HEATSINK-20x20x6MM | 1 | not sure it is really needed |
| stylus | 2 | for handwriting recognition |
| A10-OLinuXino-LIME-BOX | 6 | you can file off a keyway? for the lcd cable |
| Total | 178 |
| Name | approx. price (€) | comments |
|---|---|---|
| Bluetooth | 15 | I use the DeLOCK USB2.0 61889 - Bluetooth V4.0 dual mode network adapter - 13 |
| picture frame | 3 | you likely will have to saw because of the aspect ratio |
| USB-ISO | 35 | if you want to attach other/high voltage stuff to the board, one of those should be enough |
| easel | 5 | if you use the LCD‑OLinuXino‑10TS or A13‑LCD10TS, DIY superstore 14 (or pretty: MABEF M/16 or M/21 ~20-25€) |
| USB 2.0 self-powerd hub | 10 | |
| USB keyboard | 6 | |
| USB mouse | 3 | |
| Wii Remote | together with a bluetooth dongle makes a nice remote control15 | |
| HDMI cable | ||
| DVI to HDMI adapter |
In total one frame costs around 200-250€ (s.a. tables 1, 2, 3) . If you are really low on budget but have some time to spend, you could also try to use one of those tablets sold at ~100€ (s.a. https://linux-sunxi.org/Buying_guide) or maybe you could re-use parts (display, casing?) of those digital photo frames sold for around ~40€?16 On the other hand it's really better to support open-source hardware manufacturers and you can use the boards for other fun stuff, too.
3.1 Electric energy consumption
As the devices are always on electric energy consumption should be low. A friend measured the electric energy consumption of the A20‑OLinuXino‑MICRO with a A13‑LCD7‑TS and different USB devices connected including the power supply unit (PSU) (s.a. Figure 2). In short you can expect around 3.5W if the display is on and around 1.5W if it is off.17 I think this is acceptable.
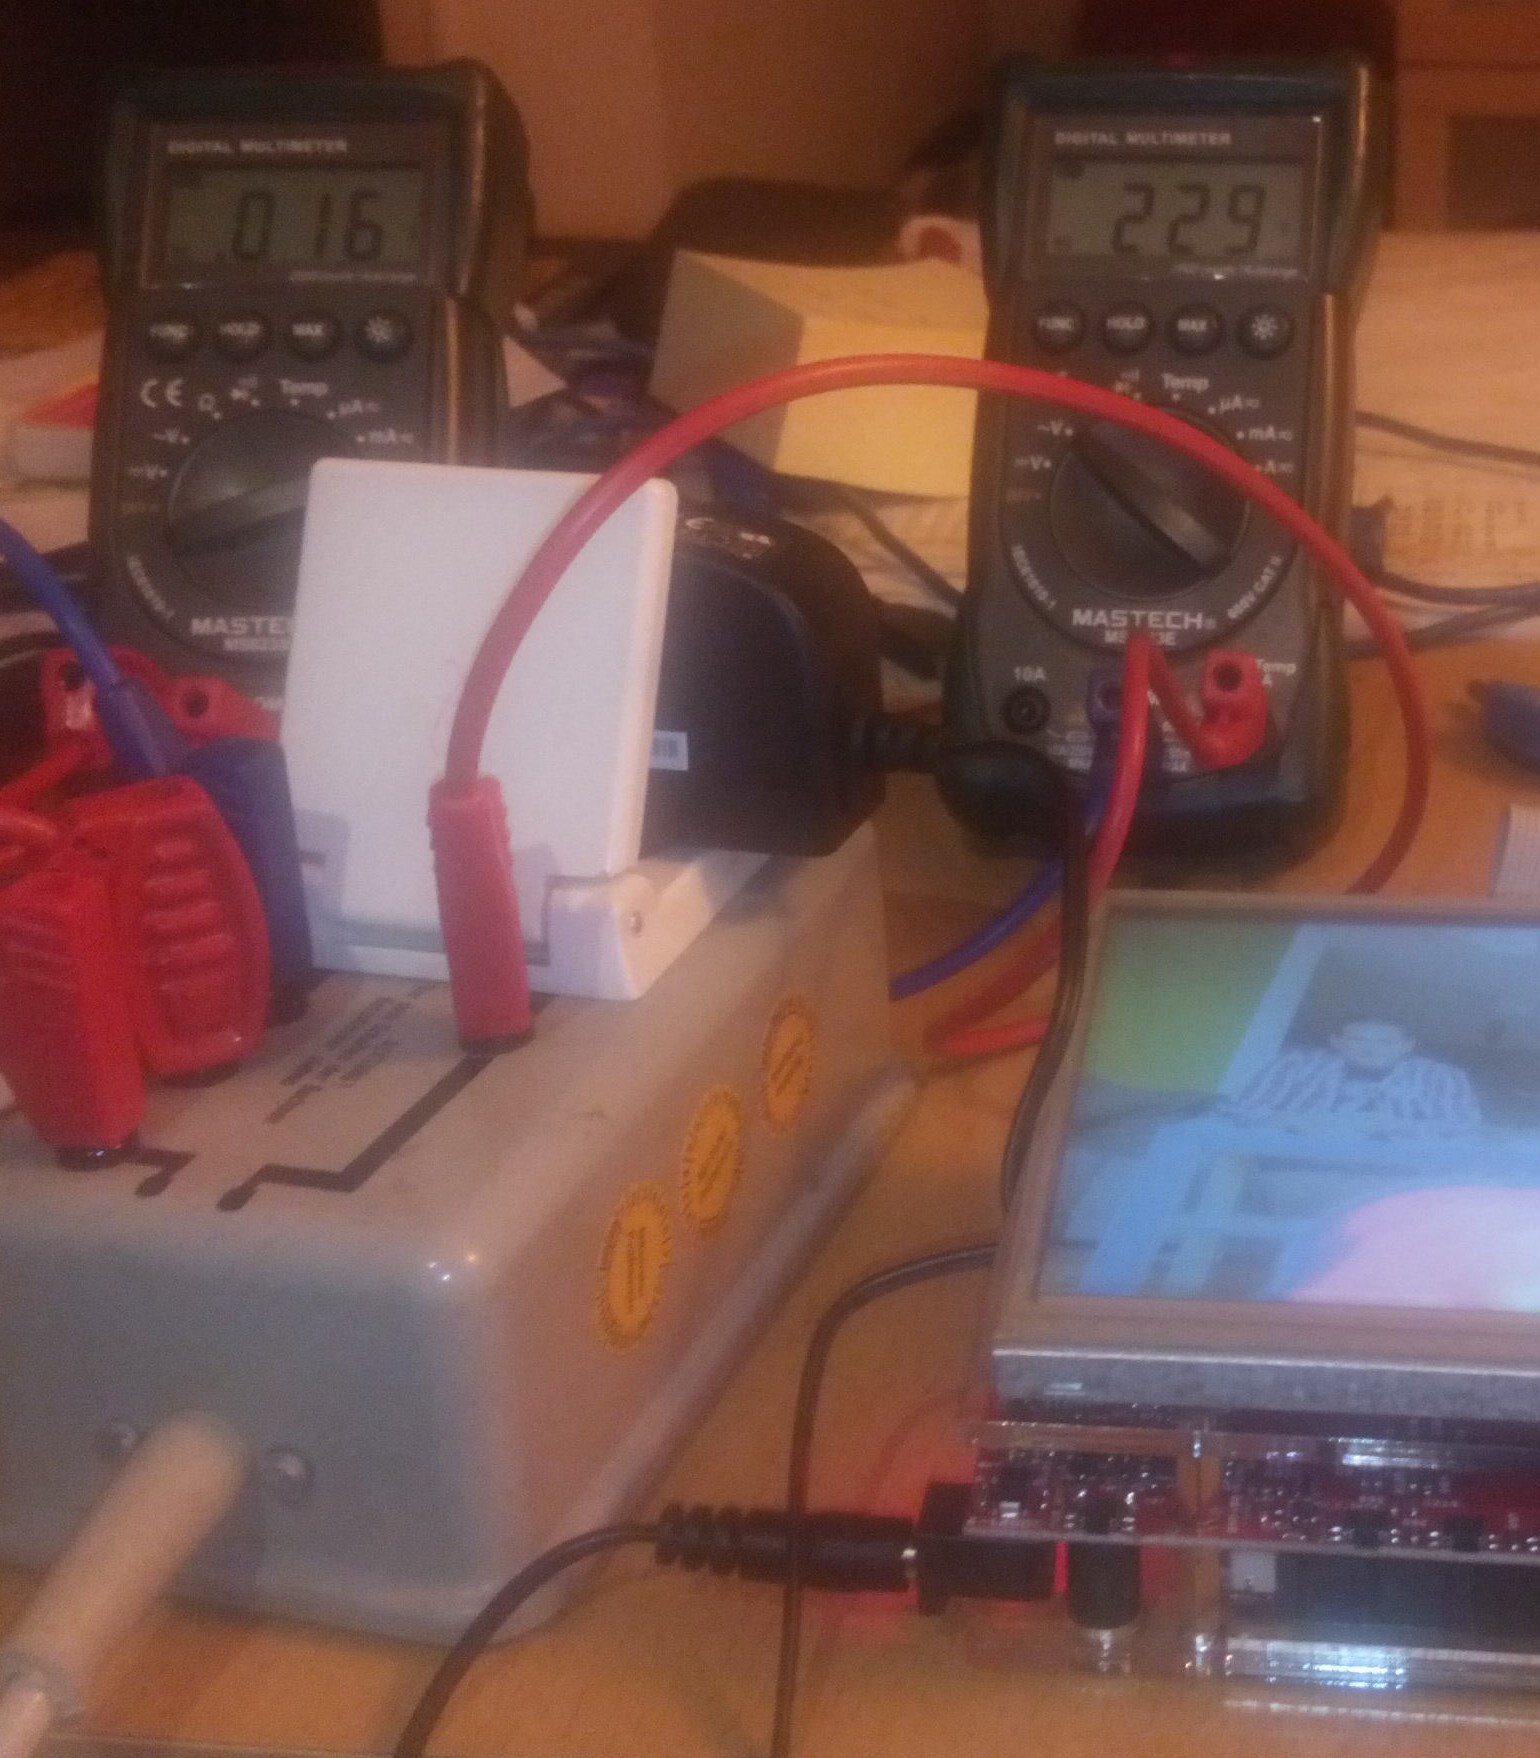
Figure 2: measuring electric energy consumption
4 Free software
As operating system Debian GNU/Linux for the armhf architecture is used.
4.1 Linux kernel
Debian's 3.16 armmp kernel version in jessie is now good enough18. Only a custom device tree file is still needed to make the touchscreen work.
4.2 U-Boot
To boot the Linux kernel the boot loader "Das U-Boot" is used. Debian's U-Boot version in jessie isn't good enough. At the moment I am using a modified version from debian/testing. For now for each possible hardware setup a different U-Boot binary is provided in the u-boot-sunxi Debian binary package in the Prisirah repository19. The corresponding source is in the u-boot Debian source package.
4.3 Secure Shell (SSH) and Tor
To transfer the pictures from frame to frame Secure Shell (SSH)20 and Tor hidden services21 are used.
For the initial pairing of the frames you have to enter the host part of the hidden service address, called friend code in the GUI for simplicity.
4.4 Graphical user interface (GUI)
The special purpose touch-screen GUI is written in gauche scheme and uses SVG. For text input the handwriting recognition software CellWriter is used.
4.5 Putting it all together and building the SD card image
A bash script is used to build a SD card image based on Debian jessie using debootstrap.
5 Building your own
5.1 Getting the hardware
As I live in Germany I ordered the Olimex parts via a German distributor. I chose http://www.watterott.com/ and can only recommend them.22
There is a list of distributors at: https://www.olimex.com/Distributors/.
5.2 Hardware setup
5.2.1 Using A20‑OLinuXino‑MICRO
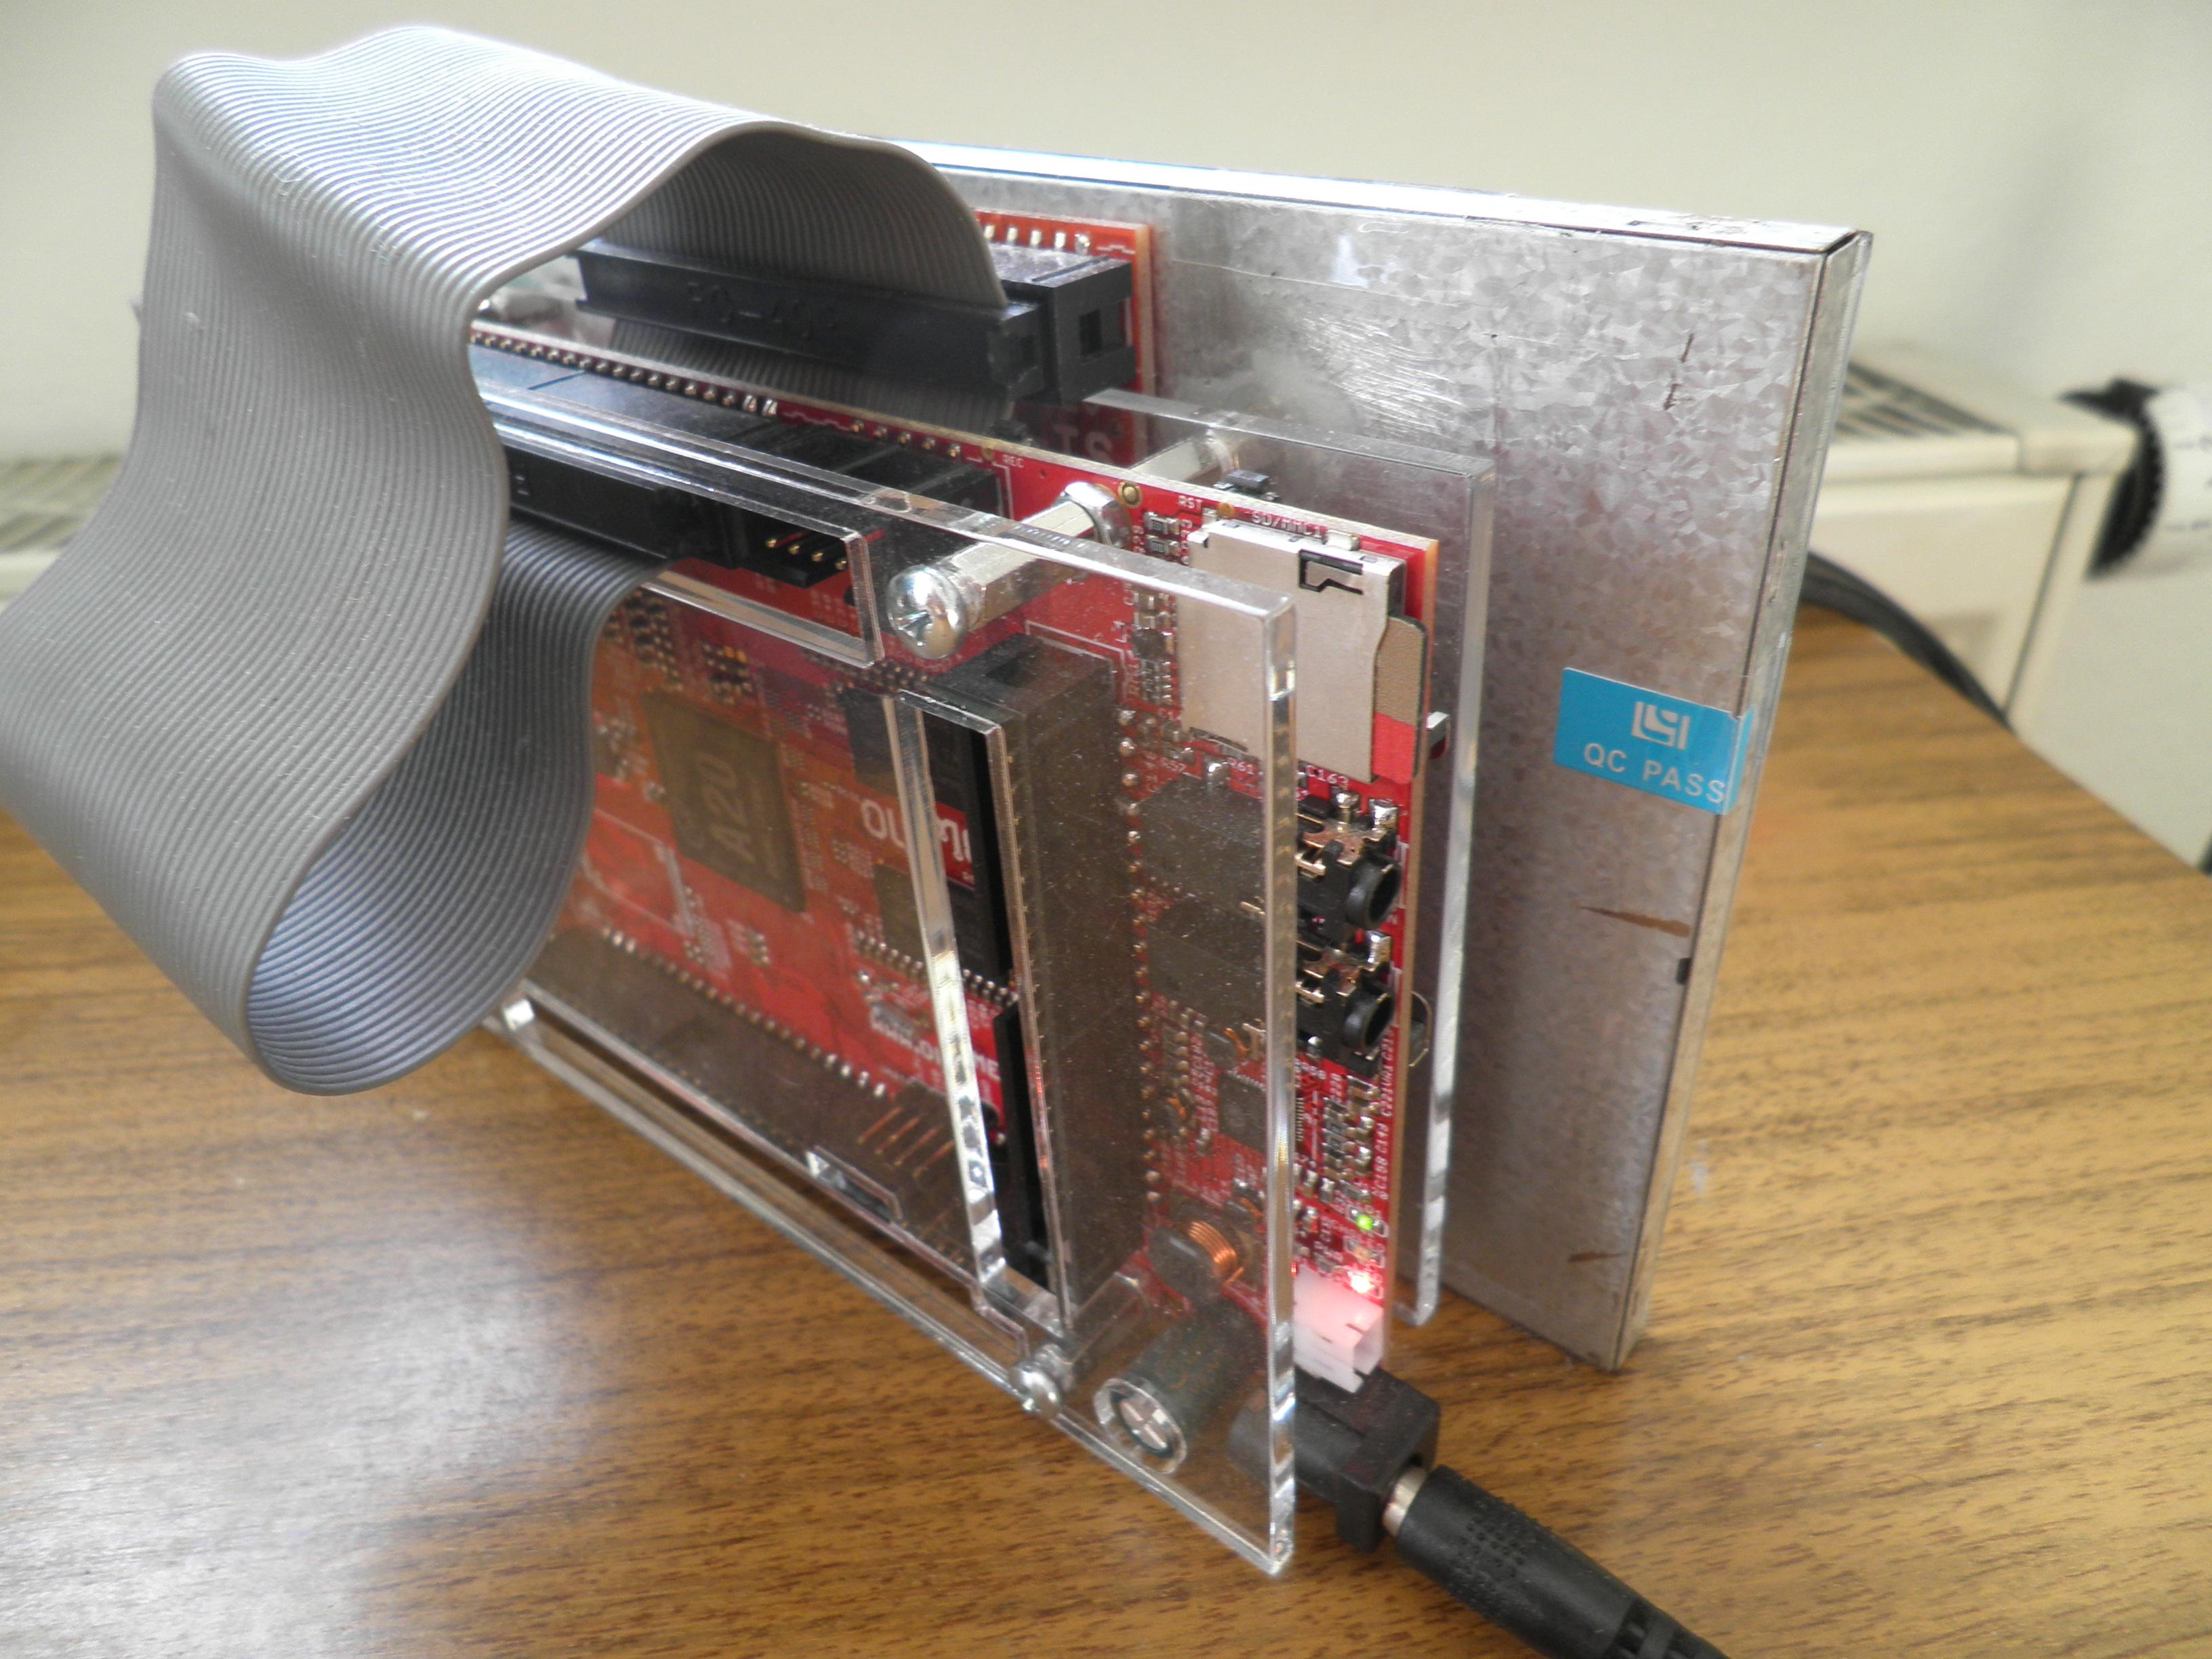
Figure 3: A20‑OLinuXino‑MICRO in a A20-ENC with nuts glued to the back of a A13‑LCD7‑TS
Fairly simple. Just connect the CABLE-IDC40-15cm to the A20‑OLinuXino‑MICRO and the LCD display. If you have the A20-ENC plexyglass enclosure, make sure to get 4 additional nuts because the ones inlcuded are too short. Also be careful not to break the thin part of the plexyglass near the LCD connector. If you have the A20-ENC and the A13‑LCD7‑TS23 you can glue24 the nuts on the back of the display to get a nice raw device (see also Figure 3). For details read the official manual25.
5.2.2 Using A20‑OLinuXino‑LIME2
A little bit more tricky. Make sure you plug in 5V only! 26 Be very careful with the LCD cable (likely you will break one). Try to get it right on the first try, so you don't have to remove it again (see also Figure 4). If you have the nice A10-OLinuXino-LIME-BOX you may have to play with the board direction, at some point everthing should just fit. To get the cable out of the box you have to file off a notch.
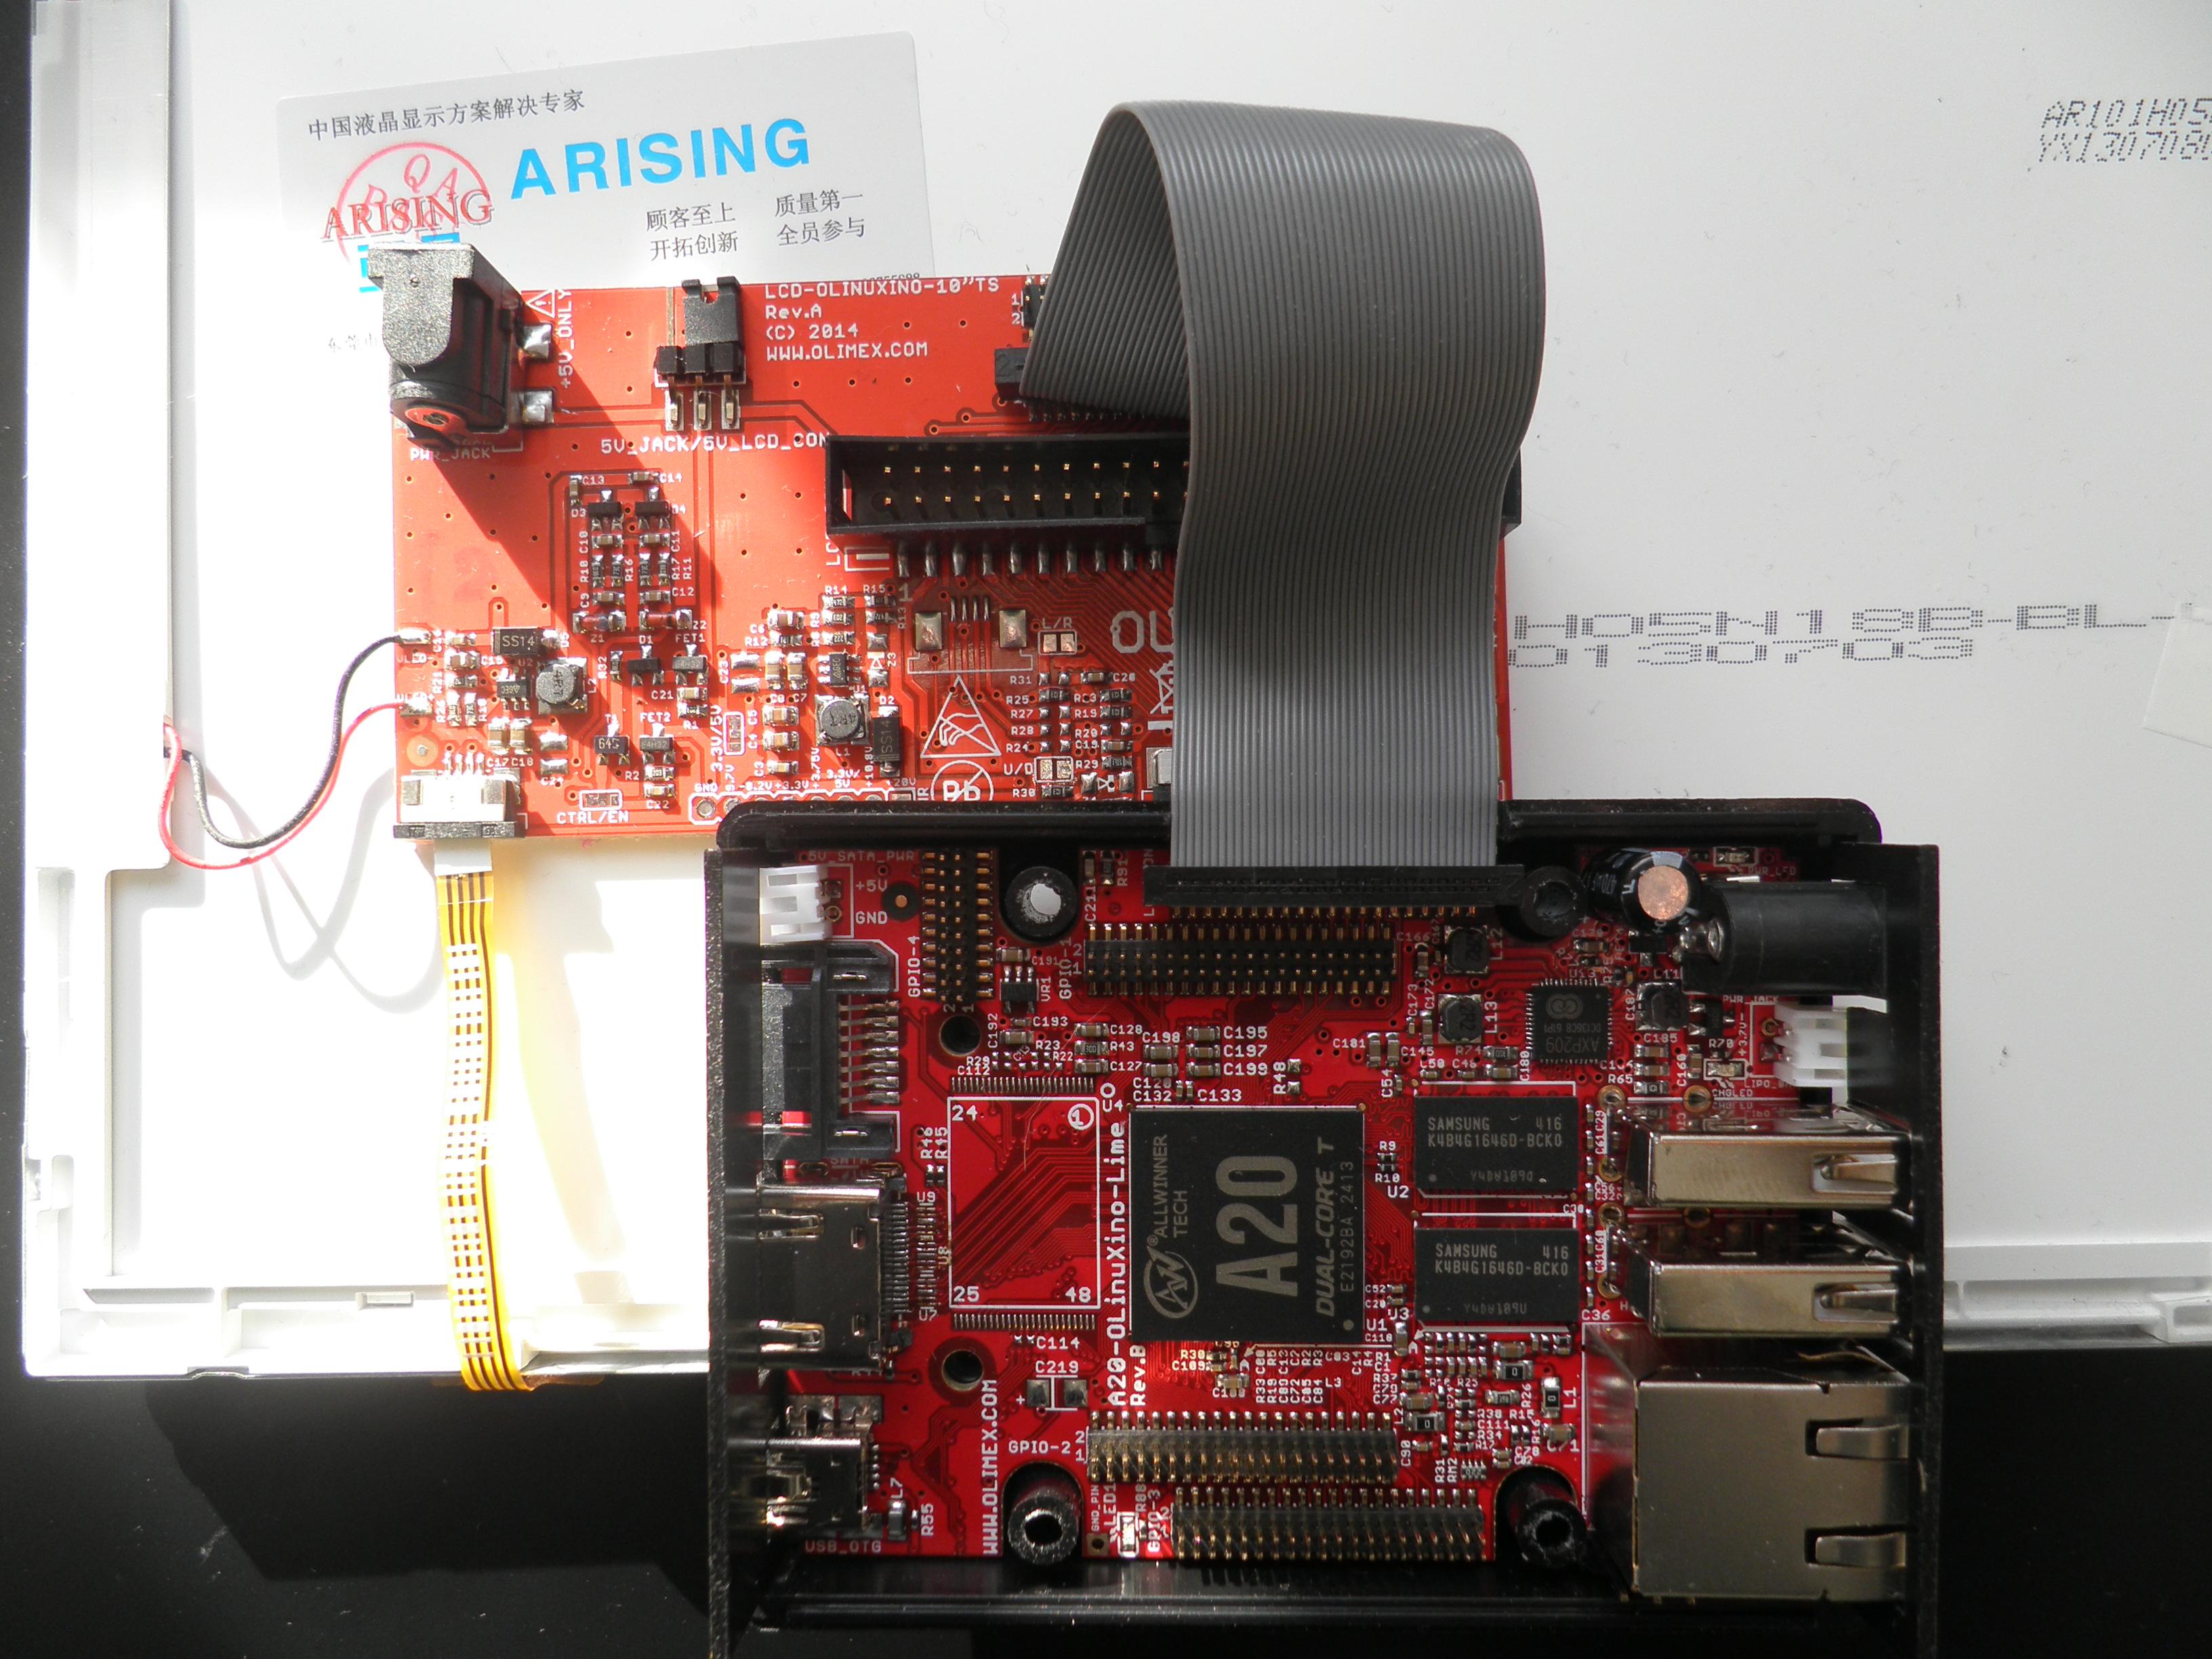
Figure 4: A20‑OLinuXino‑LIME2 with CABLE-40-40-10CM connected to LCD‑OLinuXino‑10TS sitting in the A10-OLinuXino-LIME-BOX with a filed off notch for the cable
For details read the official manual25.
5.3 Software setup
5.3.1 Using pre-built prisirah image and U-Boot
For your convenience there is a pre-built compressed Prisirah disk image (including U-Boots) you can write to your SD card. The image can also be used for a self-hosted build (it can build itself). The following assumes you use some Linux system.
- Get my public GPG key
To get my GNU Privacy Guard (GnuPG or GPG) public key do:
$ gpg --keyserver keys.gnupg.net --recv-key E682ADC8 $ LANG=C gpg --fingerprint E682ADC8 pub 4096R/E682ADC8 2013-01-05 Key fingerprint = 0E2F E7D0 941E 53D1 B748 14B7 CFCD E252 E682 ADC8 uid Jens Thiele <karme@karme.de> sub 4096R/27C72A37 2013-01-05 - Download and verify Prisirah image
$ wget 'http://karme.de/prisirah/image/prisirah-latest.img.bz2' \ 'http://karme.de/prisirah/image/prisirah-latest.img.bz2.sig' $ gpg --verify prisirah-latest.img.bz2.sig prisirah-latest.img.bz2 - Copy Prisirah image to SD card27
To copy the image to your SD card you must know the corresponding device name of your card reader. If you don't know it, maybe the simplest method is to compare the output of the mount command before and after insertion of the empty28 SD card29 looking for "on /media".
First type:
$ mount|grep 'on /media'
This hopefully will produce no output. Now insert the SD card and try again:
$ mount|grep 'on /media'
/dev/sdb1 on /media/...
In this example the device name would be "sdb" (1 is the partition number). You likely will get different output and therefore a different device name.30 Don't forget to unmount the partition(s). If there are multiple partitions repeat for each partition31:
$ umount /dev/«DEVICENAME»1
If you are really sure you found the correct device and unmounted all corresponding partitions and you don't need the data on the SD card you can now simply do32:
$ bzcat < prisirah-latest.img.bz2 > /dev/«DEVICENAME» ; sync
to decompress and write the image to your SD card. This will take 5-10 minutes and produce no output in your terinal.
If you have
pvinstalled33 you could also do something like$ time { bzcat < prisirah-latest.img.bz2 |pv > «DEVICENAME» ; sync ; } 6GB 0:07:11 [14,2MB/s] [ <=> ] real 7m45.423s user 2m17.049s sys 0m40.911sinstead, to see some progress.
- Make the SD card bootable
To make the SD card bootable you have to mount the just written SD card (you can also remove and insert the card again29). You then have to find the correct U-Boot version for your setup.
Setup U‑Boot file name A20‑OLinuXino‑MICRO + LCD‑OLinuXino‑7TS (or A13‑LCD7‑TS) u-boot-A20-OLinuXino_MICRO-lcd7.bin A20‑OLinuXino‑MICRO + LCD‑OLinuXino‑10TS (or A13‑LCD10‑TS) u-boot-A20-OLinuXino_MICRO-lcd10.bin A20‑OLinuXino‑MICRO + HDMI/DVI/VGA u-boot-A20-OLinuXino_MICRO.bin A20‑OLinuXino‑LIME2 + LCD‑OLinuXino‑7TS u-boot-A20-OLinuXino-Lime2-lcd7.bin A20‑OLinuXino‑LIME2 + LCD‑OLinuXino‑10TS u-boot-A20-OLinuXino-Lime2-lcd10.bin A20‑OLinuXino‑LIME2 + HDMI/DVI u-boot-A20-OLinuXino-Lime2.bin To install U-Boot you then do34:
$ dd if=/media/boot/u-boot-A20-OLinuXino«SETUPSPECIFIC».bin \ of=/dev/«DEVICENAME» bs=1024 seek=8 - Unmount SD card
$ umount /media/boot
5.3.2 Using prisirah-image-builder to build your own image
for now take a look at the output of35:
$ git clone https://www.karme.de/git/prisirah-image-builder \
 && cd prisirah-image-builder && ./prisirah-image-builder --help
5.3.3 First boot
Insert your microSDHC card and power on.36 Keep your stylus ready to calibrate the touchscreen (s.a. Figure 5). The first boot at the moment is very slow so please be really patient.37
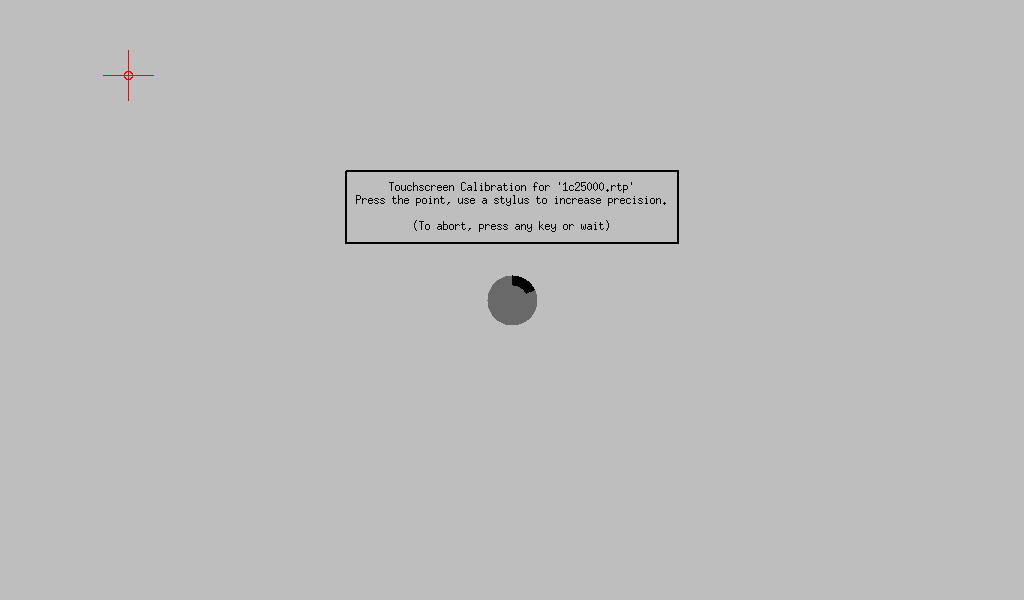
Figure 5: touchscreen calibration using xinput_calibrator
After waiting some time your initial password for the user "prisirah" will be displayed. Maybe setup your wireless network (s.a. Figure 6).38
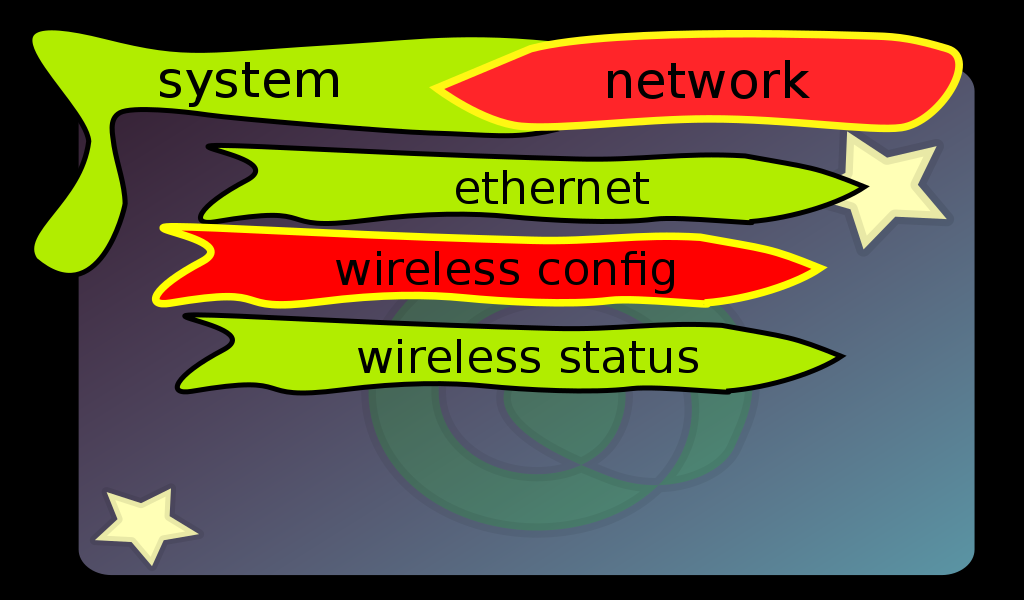
Figure 6: network configuration
5.3.4 Remote access
If the network is up, you can use the initial password to login via SSH and change your password39:
$ ssh -t prisirah@prisirah.local passwd
It is recommended to setup key-based authentication. If you don't have a SSH key pair yet, create one using something like20:
$ ssh-keygen -t rsa -b 4096
or
$ ssh-keygen -t ed25519
To copy your public SSH key to the Prisirah do:
$ ssh-copy-id prisirah@prisirah.local
If you verified key-based login works, best disable SSH password login alltogether:
$ ssh -t prisirah@prisirah.local sudo \
   sh -c    \
    "'sed -i \
         \"s/^#PasswordAuthentication yes/PasswordAuthentication no/\" \
          /etc/ssh/sshd_config \
      && service ssh reload && echo ok'"
Verify you can't login with password.
5.3.5 Friend setup / initial pairing
To add a friend (s.a. Figure 7) you have to exchange friend codes and add each other in the "add friend" menu.
WARNING: at the moment you should only add real friends, as you grant remote access to your Prisirah.40
For each friend a user friend»FRIENDCODE« is created and "traditional Unix permissions" and access control lists (ACLs) apply.
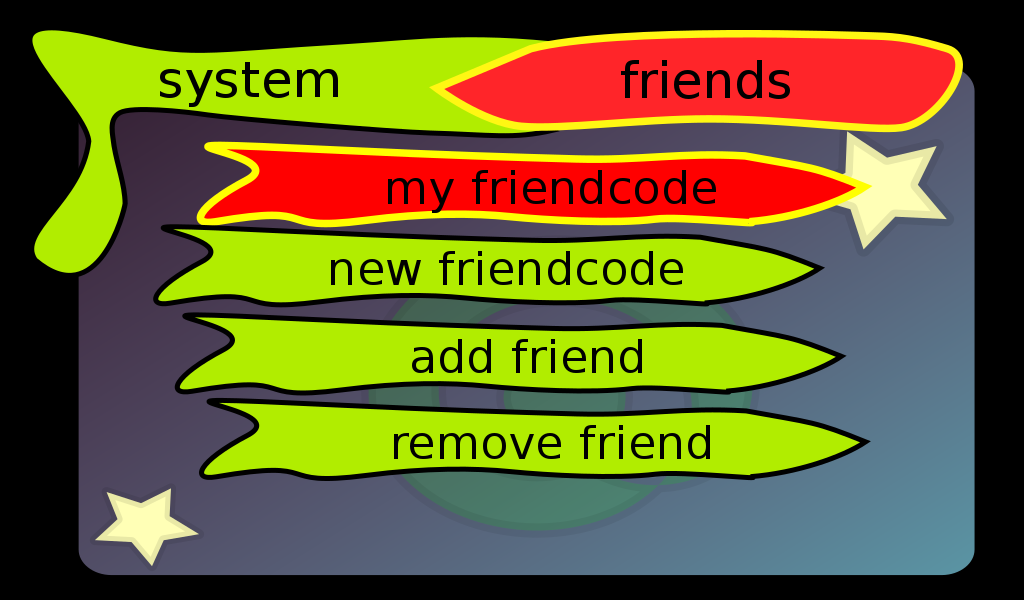
Figure 7: friend configuration
5.3.6 Getting photos onto your frame
To get photos onto your frame just plug in some USB mass storage device (USB flash drive, digital camera, …) or if you did set up remote access (see 5.3.4) use SSH/SFTP maybe via some nice front-end. If you use GNOME, KDE, Xfce, MATE, Cinnamon or similar on your "normal computer(s)", the Prisirah should show up in the network folder.39 If you want to access your Prisirah on the go from your laptop you might wish to install Tor and netcat-openbsd on your computer and adjust your SSH configuration. On a Debian(-based) distribution you would do something like:
$ apt-get install tor netcat-openbsd
then add something like:
Host *.onion
     IdentityFile ~/.ssh/id_rsa
     ProxyCommand nc.openbsd -X 5 -x 127.0.0.1:9050 %h %p
to your ~/.ssh/config.
The A20‑OLinuXino‑MICRO also has a second SD card slot where you could insert a SD card with photos to import.41
5.3.7 Which photos are copied where?
All image files you put into prisirah.local:/home/prisirah/share/all
will be shared with all friends. They will show up in
«FRIENDCODE».onion:/home/friend«YOURFRIENDCODE»/all. If you want to
share some photos only with a specific friend you copy them to
prisirah.local:/home/prisirah/share/«FRIENDCODE» and they will show
up in «FRIENDCODE».onion:/home/friend«YOURFRIENDCODE»/«FRIENDCODE».
You can place relative symlinks in /home/prisirah/share to serve as
aliases / pet names.
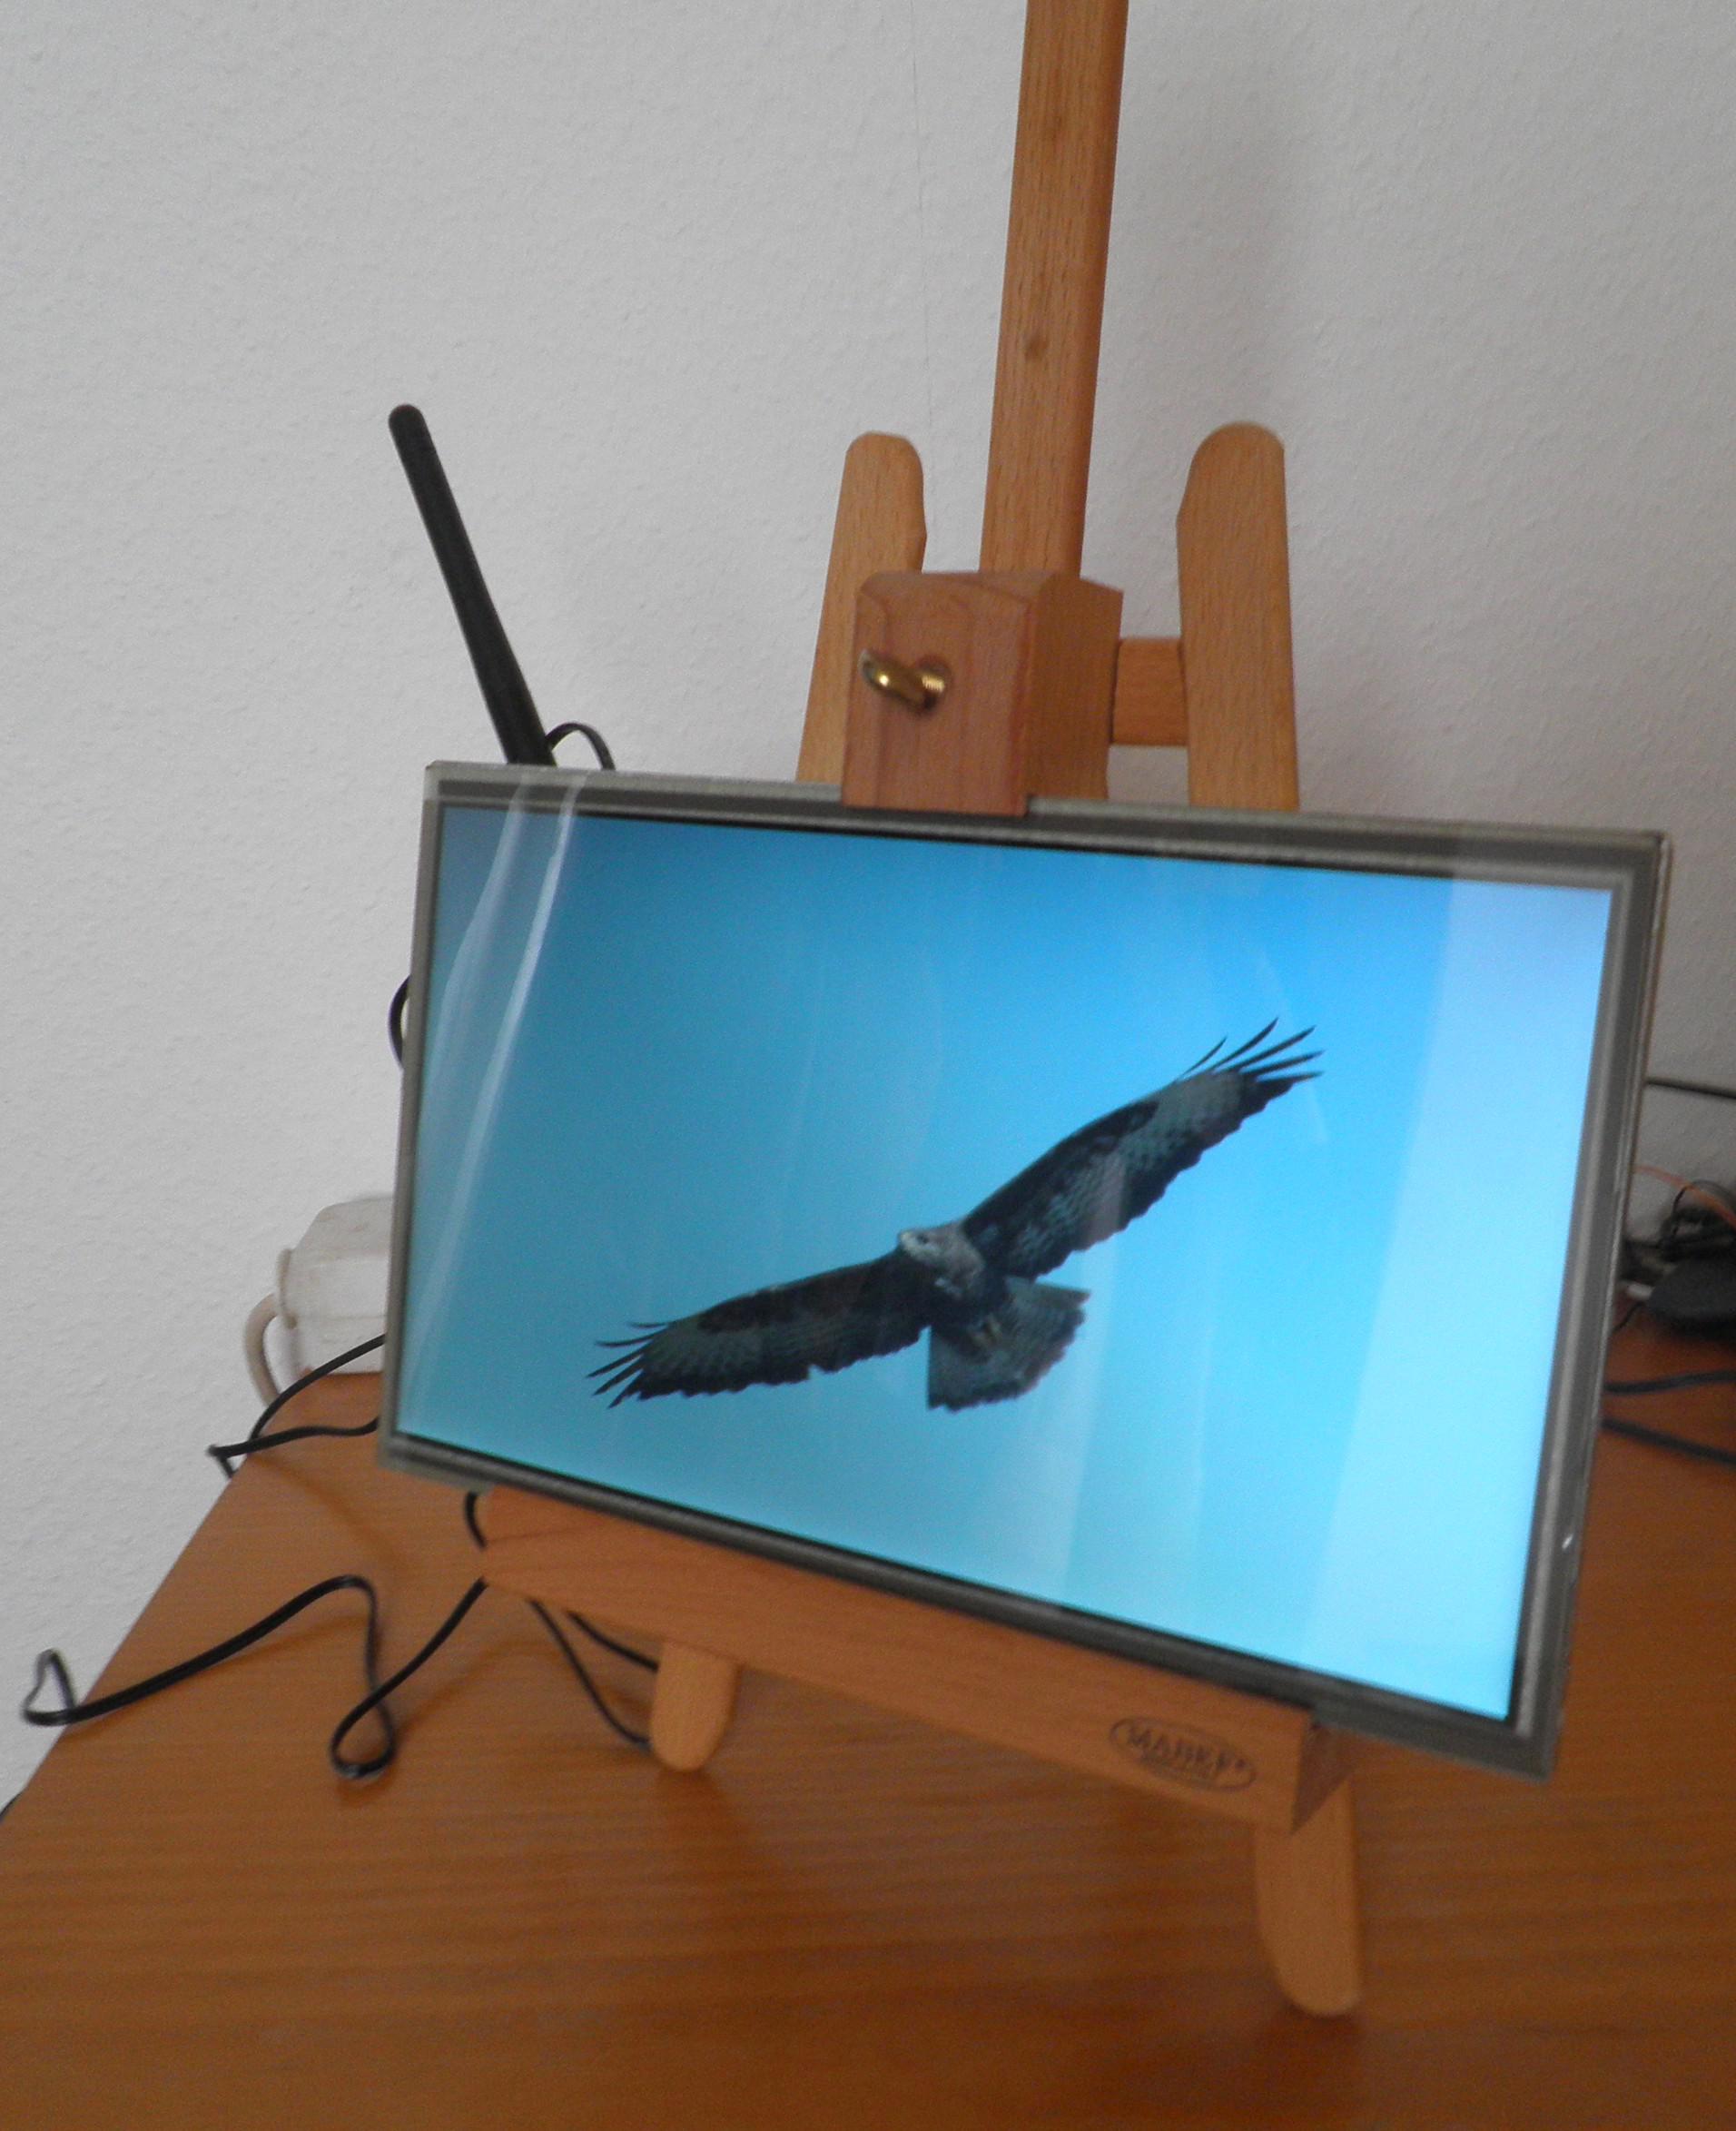
Figure 8: LCD‑OLinuXino‑10TS (A20‑OLinuXino‑LIME2 on the backside) on a Mabef M/21 easel (center of gravity isn't ideal)
6 Todos / bugs / future
Many…
In the long run this project maybe should be based upon Debian's FreedomBox project and/or the parts should be integrated into Debian.
7 Getting help
Unfortunately I didn't manage to setup a mailing list, yet. For now just contact me directly by e-mail.42
7.1 "FAQ" / known bugs
7.1.1 My prisirah stays at version 0.303-1 and doesn't update anymore
Yes, unfortunetely there is a bug in unattended-upgrades. You may have to run the update manually. First check if you are hit by the bug:
$ LC_ALL=C sudo unattended-upgrade -v
Initial blacklisted packages:
Initial whitelisted packages:
Starting unattended upgrades script
Allowed origins are: ['origin=Debian,n=jessie', 'origin=karme.de,n=jessie']
Cache has broken packages, exiting
Cache has broken packages, exiting
If the output contains "Cache has broken packages, exiting" you run:
$ sudo sh -c "apt-get update && apt-get -f dist-upgrade"
7.1.2 I used a prisirah image version < 0.15 and the prisirah doesn't boot anymore
Yes, unfortunately there was a bug. To fix it you either can update to Prisirah image version >= 0.15 or if you have a working Debian(-based) system43 you can try to fix the boot script as follows. Before you start insert your SD card into your card reader. Basically we want to insert the kernel version to use at some point of the boot script. Therefore we have to edit "boot.cmd" and reprocess it to a "boot.scr". One possible way to do that:
$ { test -d /media/boot \
 && sudo apt-get install u-boot-tools \
 && grep -q 'load mmc 0 0x43000000 dtb/${fdtfile}' /media/boot/boot.cmd \
 && sudo sed -i 's,load mmc 0 0x43000000 dtb/${fdtfile},'\
'load mmc 0 0x43000000 dtb/3.16.0-4-armmp-lpae/\${fdtfile},' \
        /media/boot/boot.cmd \
 && sudo mkimage -C none -A arm -T script -d /media/boot/boot.cmd \
    /media/boot/boot.scr \
 && sync && umount /media/boot \
 && echo 'ok, that worked' ; } || echo 'Sorry, mail me'
If it doesn't help, please mail me.
7.1.3 I have a A20‑OLinuXino‑MICRO with A13‑LCD10TS and sometimes after a soft reset the display is corrupted
Please let me know! For now I don't have a solution other than power off and on again (please use the menu to power off!).
8 How to help
8.1 Development
todo
8.2 Sponsors
None, yet.
9 Appendix
9.1 https and my CA certificate
You maybe don't want to trust me as certificate authority (CA), at least as long as I don't manage to setup name constraints limiting my CA certificate to my domain.44 To temporarily trust my CA certificate for Git operations I recommend something like this:
First get my public GPG key (see 5.3.1). Then download and verify my CA certificate:
$ wget 'http://karme.de/cert/karme.de.pem' \
       'http://karme.de/cert/karme.de.pem.sig'
$ gpg --verify karme.de.pem.sig karme.de.pem
You can use the GIT_SSL_CAINFO environment variable to temporarily trust my CA certificate for Git operations:
$ GIT_SSL_CAINFO=karme.de.pem git clone https://www.karme.de/git/prisirah-image-builder
You then could configure that working directory to trust my CA certificate permanently:
$ cat << EOF >> prisirah-image-builder/.git/config
[http]
sslVerify = true
sslCAinfo = $PWD/karme.de.pem
EOF
Note: if you need multiple CA certificates in the same working directory, you can just concatenate them. For example if you want to use a remote https repository on github you would do something similar to:
$ cat /etc/ssl/certs/DigiCert_High_Assurance_EV_Root_CA.pem >> karme.de.pem
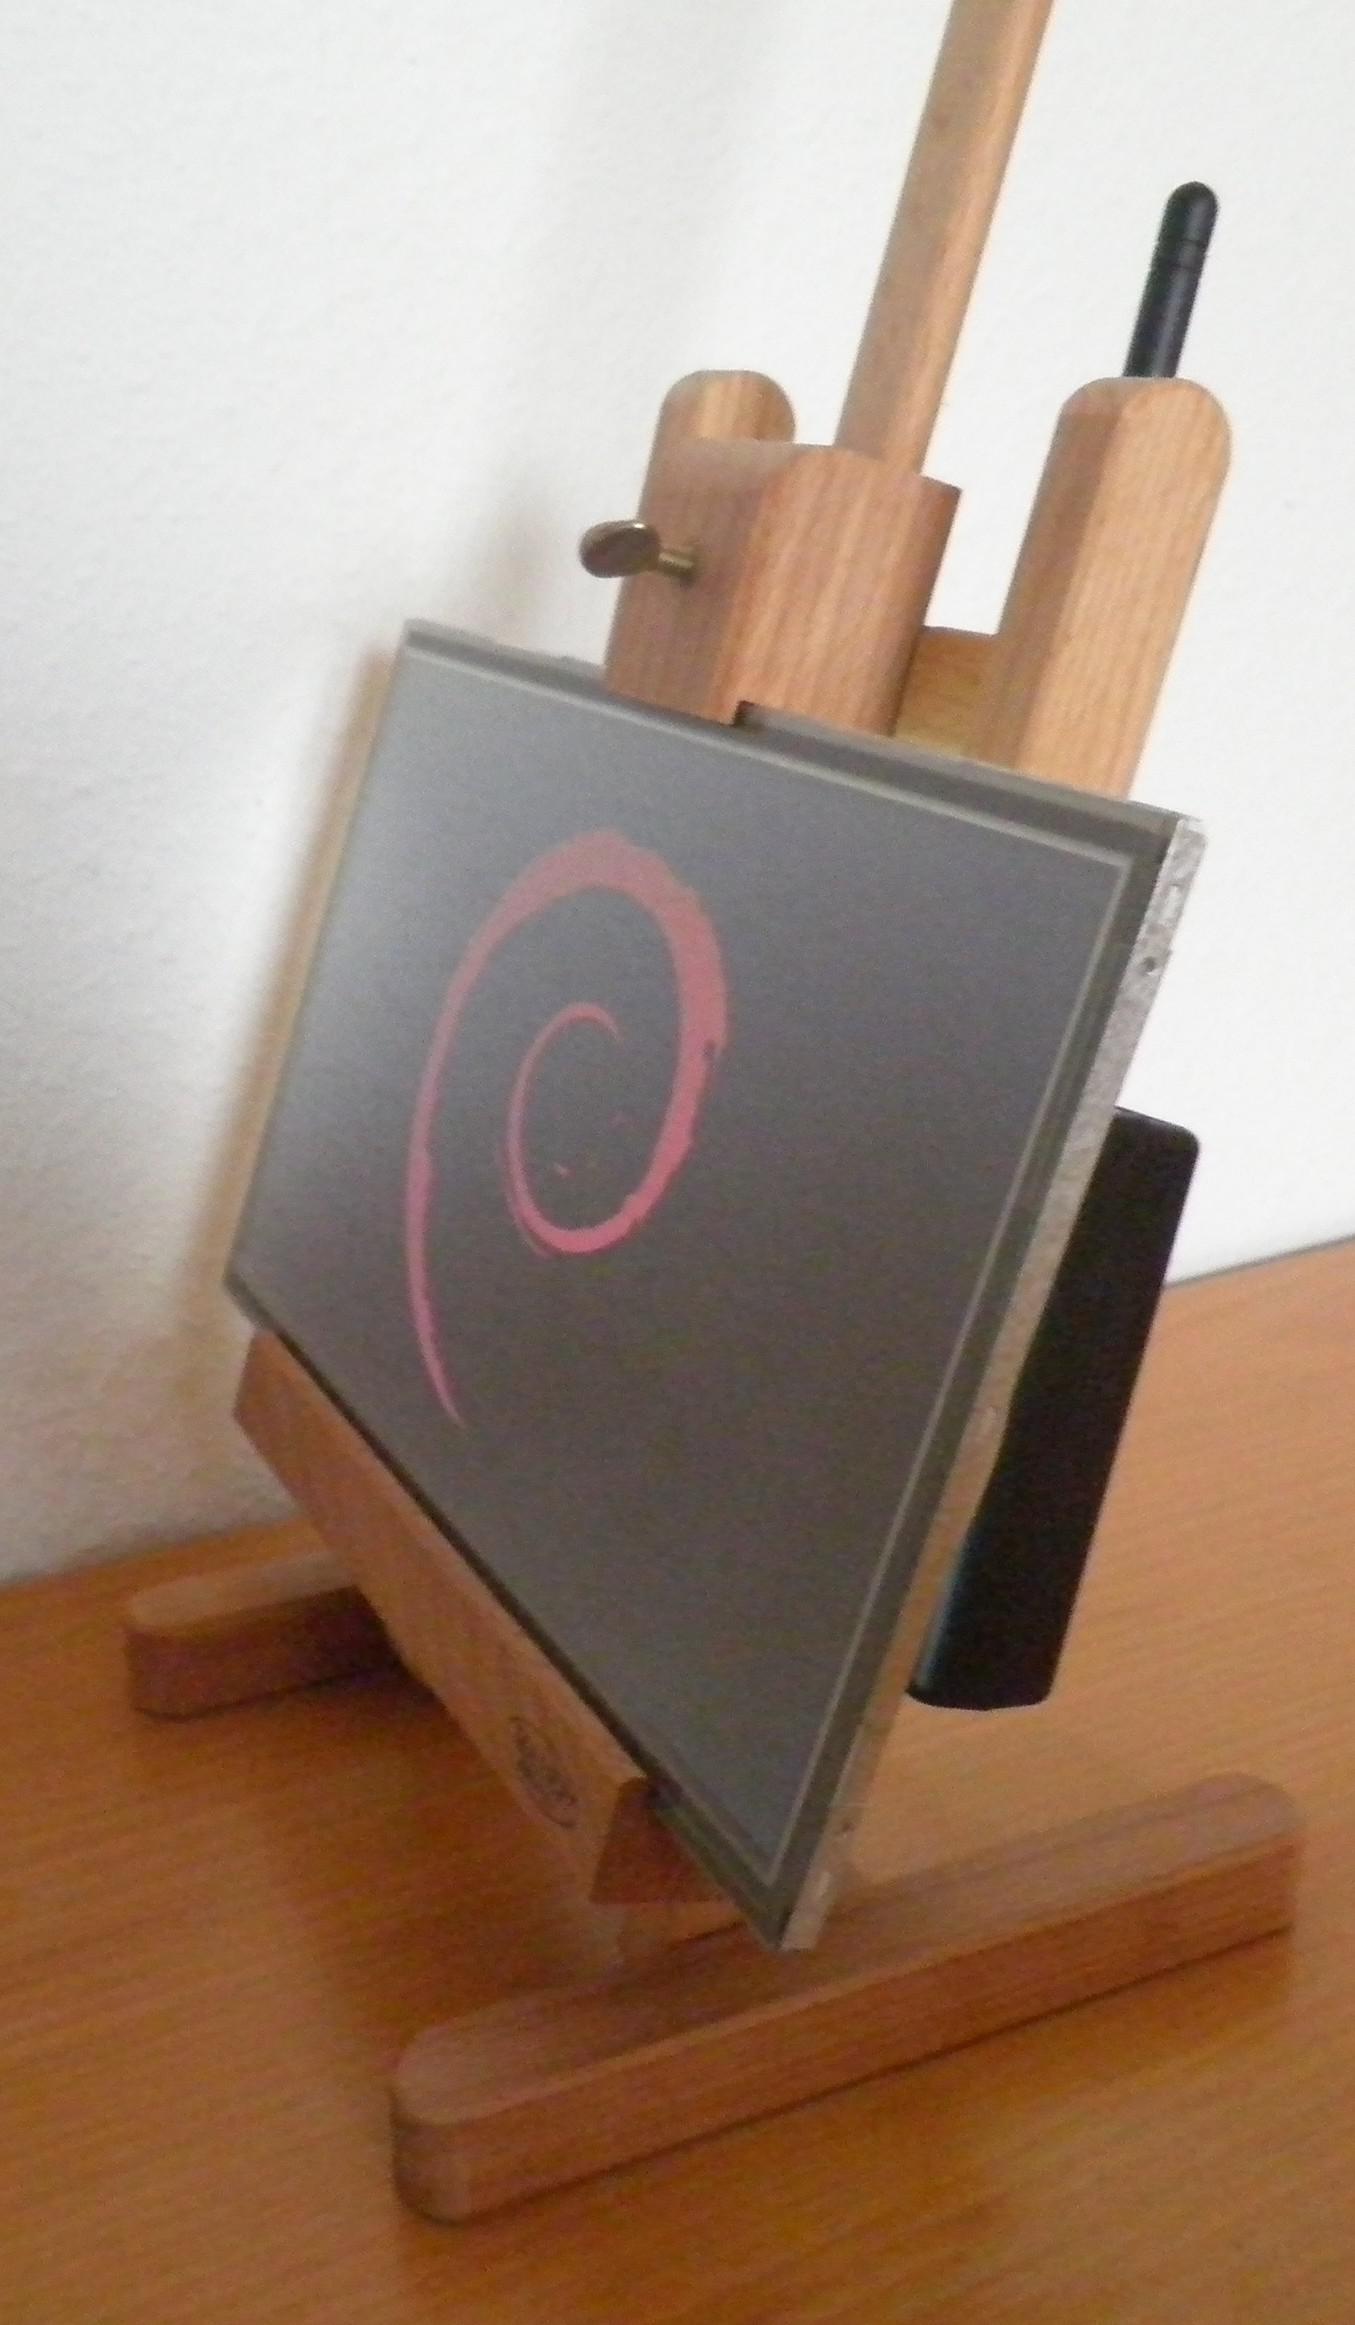
Figure 9: LCD‑OLinuXino‑10TS on a Mabef M/16 easel (A20‑OLinuXino‑LIME2 mounted on the backside using touch fasteners – my favorite at the moment)
9.2 HDMI/DVI/VGA output
If you don't want to attach a LCD touch screen, you can also connect a monitor or TV via HDMI (or DVI using a HDMI to DVI adapter).
WARNING: There were reports about TVs without grounding damaging OLinuXino boards.45
The LCD U-Boots also use HDMI if a HDMI device is connected on boot. If HDMI video mode detection doesn't work as expected, you can try to set the mode on the U-Boot command line explicitly using something like this:
$ setenv video-mode sunxi:1280x720-24@60,monitor=hdmi,hpd=0,edid=0
$ saveenv
$ reset
If you want to do this using a USB keyboard, you need to plug in the keyboard via a USB 2.0 hub (thanks, Hans de Goede - s.a. Message-ID: <549FC68B.9000107@redhat.com>, http://article.gmane.org/gmane.comp.hardware.netbook.arm.sunxi/14598).
If you have a A20‑OLinuXino‑MICRO, you can also use the A20-VGA-CABLE to connect a monitor with a VGA connector. You then could use something like this
$ setenv video-mode sunxi:1280x1024-24@60,monitor=vga,hpd=0,edid=0
$ saveenv
$ reset
on the U-Boot command line to enable VGA output.46
Imprint / Impressum
Jens Thiele
Gartenstraße 33
72131 Ofterdingen
Germany
E-Mail: karme@karme.de
Tel.: +49-(0)7071-1380760
Footnotes:
http://www.oshwa.org/definition/, if you care about terminology see also http://www.linuxtoday.com/infrastructure/1999062200505NWLF – and yes, I think we need completely free hardware designs (maybe see http://opencores.org/projects - btw. what happened to LEON?), but for now open-source hardware is at least heading into the right direction. (Update: s.a. http://www.wired.com/2015/03/need-free-digital-hardware-designs/, http://www.gnu.org/philosophy/free-hardware-designs.html)
if you build one, please let me know how much time you needed.
maybe Allwinner is a bad choice? at least until they stop violating the GPL? s.a. http://linux-sunxi.org/GPL_Violations
the enclosure is partially open
AFAIU the LIME2 runs with a faster DRAM clock speed in comparison to the MICRO? 480 vs 384MHz? s.a. https://olimex.wordpress.com/2014/10/27/a20-olinuxino-lime2-review-and-updates/ and the respective U-Boot configurations.
if you use the A20‑OLinuXino‑MICRO you can also use the older and now "obsolete" A13‑LCD7‑TS or A13‑LCD10TS
I am quite happy with the displays altogether and so far only one touchscreen component (A13‑LCD10TS) needed adjustment to the default sensitivity settings which isn't available in Debian's 3.16 kernel yet. If you have such a display you may have to use a newer kernel and an adjusted device tree file.
try to make sure not to buy fakes s.a. http://heise.de/-2635511 and http://oss.digirati.com.br/f3/
MOD-WIFI-R5370-ANT unfortunately needs non-free firmware and the antenna is a bit fragile? better alternatives? otherwise the first batch of the adapters worked really well. The second batch included one non-working adapter with a different chipset, but Olimex would have replaced it. But maybe you already have some wireless adapter? I also can somewhat recommend the more expensive Tehnoetic TET-N150 (via http://www.fsf.org/resources/hw/endorsement/respects-your-freedom) which has a free firmware (that unfortunately is not yet in debian and I didn't test it, yet) though I still am inspecting some troubles with avahi and strange disconnects. Olimex now also has MOD-WIFI-AR9271-ANT using the same chipset and firmware, but I didn't test it yet.
software support in the GUI is still lacking
I got some at Hornbach
initial pairing via cli/bluetoothctl only at the moment
looks like it isn't that easy: http://www.heise.de/ct/projekte/machmit/ctlab/wiki/DigitalerBilderrahmen
measurements were taken using the sunxi-3.4 kernel - todo: repeat with mainline kernel, A20‑OLinuXino‑LIME2 and LCD‑OLinuXino‑10TS. (A quick test with A20‑OLinuXino‑LIME2+LCD‑OLinuXino‑10TS+kernels 3.16/4.2 suggests something more like 2.5W and 5W)
Note: not all hardware features are supported. For details see Linux mainlining effort. Note simplefb has been by TODO backported to 3.16
The stable Prisirah repository is at "deb http://karme.de/prisirah/debian jessie main". There is also a unstable version at "deb http://karme.de/prisirah/debian unstable main".
At the moment there is some speculation regarding the security of SSH and which settings to use. See also: http://www.spiegel.de/international/germany/inside-the-nsa-s-war-on-internet-security-a-1010361.html, https://stribika.github.io/2015/01/04/secure-secure-shell.html and debian bug #774711. Looks like it is this https://weakdh.org/
Tor should make it harder to track who knows who, but mainly it is used as relay for NAT traversal.
I ordered by e-mail and paid on delivery ("per Nachnahme"). Maybe they read this and want to sponsor the project?
should work with the LCD‑OLinuXino‑7TS, too
I used "UHU ALLESKLEBER SUPER Strong & Safe" which worked until I mounted a prisirah on my bicycle. Now I test "UHU plus endfest 300" - a two-component adhesive, which looks good so far.
please note that the software instructions don't apply to the prisirah image
especially if you have both – a MICRO and a LIME2 – as the PSUs look nearly identical and have the same plug but different output Voltages!
assuming you are using Linux. For other systems maybe read http://www.ev3dev.org/docs/tutorials/
typically the cards are not really empty but contain a DOS partition table with one primary partition with an empty FAT filesystem
assuming you use some "desktop Linux" automounting SD cards and using the filesystem label as mount point (looks like this isn't always true?).
still unsure? maybe read how to find storage devices attached to computer
replace "«DEVICENAME»" with your device name! in this example this would be "sdb".
If you have pbzip2 installed, you could use pbzip2 -d instead
of bzcat but depending on your hardware the bottleneck might be the
SD card and not the decompression.
on Debian(-based) distribtions you could run "sudo apt-get install pv", to install it
replace "«SETUPSPECIFIC»" and "«DEVICENAME»"
The A20‑OLinuXino‑MICRO has one SD and one microSDHC card slot. We use the microSDHC slot to boot.
might take up to 5 minutes
ethernet should work out of the box
if it doesn't work and you use an SD adapter, try another one!
feel free to encrypt using GnuPG
any Linux system should do as long as you manage to install mkimage from u-boot-tools
on the other hand you likely really shouldn't trust most of the CAs you do trust at the moment
you likely will have to adjust the mode